this page,Paint - choice, technictips, color effect..
brush or roll - filter - handles -
open and close the pot - filter the paint -
clean painting - cleaning paint - preserving the paint
effects, influence of paint -
alterations - preparation, rust
- futility.
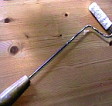
Regular small paint roll
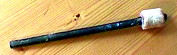
Straight roll for wrought iron
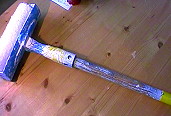
This roll has a long handle so that it can be hold with two hands
Brush suitable for glossy paint (it allows to well line the edge); use it with small surface because a small roll can be better.
- Open the pot. Before "butchering with a screwdriver", try to gradually
take off the lid with a knife blade (a real one, with a sharp blade and fine cutting edge, thick and strong opposite, on
the back). If you can bring the blade a little, the rest is patience.
Follows around gradually and not to pry it out completely by one or two points. Another unexpected tool very effective is ..
nail clippers ! Insert the cutting part in the gap pot-lid then make leverage on the edge of the pot. This works with any
current model, even cheaper. Best is to dismantle the two parts. The model for large nails toes do not fit into the gap.
The square pots
are the most difficult to open. Insert a blade at the locations
closest to the edge (4 white lines) to be able to leverage and with
patience, it can come without too much damage!
Device to open the cover, theh bond it to the pot and add the brush
My patented idea came semifinalist at a contest for innovation in Normandy. Commonly used at home, my
ustensil allows to move carrying pot, lid and brush with one hand. "Opener,
holder for pot, lid and brush". "To know more" "manufacture".
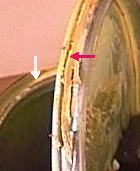
- Close the pot Sealing the pot. The groove of the box fills up quickly with
paint that has to be removed to be able to reopen it. Less visible is
the layer that is deposited on the side cover (especially against the
rolled edge) as the seal is no longer assured, the cover from
sinking more than half. It is imperative the scratch.
Cleaning the groove of the pot with a cloth or paper and knife.
Before closing the paint, scrape the paint around the edge of the
cover because old dry paint is accumulated there, preventing a
proper
closure (and thus the seal).
Pressing on the lid;
do not hammer on the center of the lid, but on the outside edge.
It is preferable to put on a piece of wood (a small cutting board)
strongly pressing on it with the weight of his body, hands folded,
standing in above, belly forward if necessary.
- Painting 1 - Brush or roll ?
For small surfaces and final improvements, the brush is
practical, but for surfaces like a rack, a piece of
furniture, a door, a framing of window and even a partition,
a small roll is much more effective and faster (these
rolls "velvet", make approximately from 5 to 10 cm length on
2.5 cm of diameter);
for a door frame, take a rather long handle (25/30 cm) so you have not to climb up on a stool.
For the partition, such a handle will enable you to reach the top with only one stool of three steps or a solid chair.
Painting a large external wall, require a traditional roll (much larger), but the problem of the handle remains: a
friend of my daughter badly complained to have with the
wrist to paint a great surface and I suggested to him to
extend or replace the handle with 40 cm length handle,
possibly surrounded of a ribbon "grip" as those of the
rackets of tennis which one rolls around, or handlebar of
bicycle. With such a handle, you hold the roll with two
hands, it does not turn between your fingers anymore and
that changes all; the person in question was delighted using
this technique.
For a ceiling, one sells rolls with a very long handle, but difficult to manage.
Note. for the small rolls : the ideal is to manufacture oneself the
duitable handle ; these small rolls are held by a strong wire from approximately 4 to 4,5 cm diameter. One can find
such round irons in the stores of do-it-yourself but also think of using for example an old handle of a dustbin of
kitchen, that of a 5 kg pot of painting... If the diameter is insufficient, it is necessary to add a tube and there
intervenes recovery (tube of cartridge of standard ball point pen roller, telescopic bits antenna of radio set.
One bends the wire and the roll fixes while forcing a little
(there is a kind of ring inside so that it turns freely).
One can also cut the small roll to the desired length for
sometimes 4 cm are enough but there are problems to solve
for non handymen. The wire is manufactured consequently. On
the side opposed to the roll, it is necessary to add a
handle : if you do not have anything to get (round wooden
end, handle of file, tool of garden...), think at the
plastic "fix everything" (see repair") to surround the
wire with a thick layer allowing so that you feel yourself
comfortable to seize it well.
- Straight roll ? yes and that does not exist : for the
ironwork, wrought iron, it is essential to manufacture a
straight handle directly inserted in the small roll (with
a stick of the good diameter). Test it, adopt it.
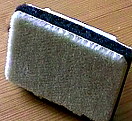
- Pad brushes ?one finds pad brushes
in matched dimensions which are made also with these
"velvet" hairs. They are more ancient than the small brushes
; I used them before the appearance of these small rolls and
they preserve advantages for certain works; they ensure a
good work and are very fast; they are perfect to enamel and
for paintings "with water". Now, I reserve them, in small
dimensions, for touching up along a pane, of a moulding
because they make it possible to approach with a high degree
of accuracy and "to draw straight" without dribbling.
- Fabric brush. Roll up a piece of fabric around a stick or
a spatula by making it exceed sufficiently: you carried out
a provisional brush which you will throw; for final
improvements, but not to enamel !!
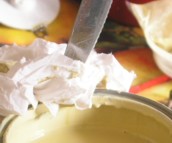
- "skin" of paint
if you must remove "the skin" of paint, take
a small pocket paperboard of advertising CDROM; with a hand
you remove the skin, with the other you open the small
pocket while pressing on the sides; you even can, by
retaining the pieces of skin, to make run up in its limps
the painting carried in the operation. Clean and easy. Pour
some thinner above painting before closing
again.
- Filtering and mixing paints and varnishes
- It is not easy to find a suitable painting filter ; the paper cones for coffee machine is too
fine. I suggest recovering a sun screen for windows car
(those ringed, with suction cup)form a pouch above the empty
pot. I am personally satisfied. Another possibility : use a
woman stocking (if paint does not pass through, try to
make a pocket and press (put on a plastic glove) like a
distributor of cream for pastrycook.
Prepare before a plastic bottle cut out to pose the stocking
and filter the paint. Clean roughly the pot and transfer it.
If you have to mix paints together, take also a plastic
bottle and stir swiftly with a tiny stick.
//// Painting 2
PAINTING CLEAN
Carrying a can of paint. To more easily hold your pot of painting
and also carrying it more safely, put it in a small 20 cm diameter basin (approximately), which will be reserved for cleaning works. The basin is very useful to place the
lid, rags and brushes. It is useful to have the lid with oneself to limit the drying of painting in the pot (put it simply onto),
especially if one is stopped or if the work is long; also to protect the paint from possible dirtinesses.
- Pot screwed bonded paint.
If you have poured the bottom rest of a pot into a glass jar with a lid screwed, chances are that the screwed lid will be
glued by the paint. Hot water. Run warm water over the edge of the lid.
Gloves. Wearing gardening gloves with gripper coating can help (rough-looking rubber surface).
Or cut two pieces of non-skid mat, one to put under the glass jar, the other to put on the lid.
Screwdriver.
If nothing happens, put the pot upside down, insert a screwdriver
between the lid and glass to crack a little the lid in several places.
Turn it right and unscrew. So you dont spoil anything. There are of
course, special clips, ribbons of steel to unscrew etc.
- Cleaning and conservation of brushes.to know more.
Prevents the brushes from drying between several interruptions (may take
several days) and allows you to take and keep the brush on the work
site, and finally, greatly facilitates the thorough cleaning of the brush,
or even roll without getting dirty. With next to nothing, the benefit is
immense.
- Idea:
keep the yogourt or cream pots, or better,
doses of detergent for washing machine (balls) to clean your brushes.
Start with thinner (white spirit) or a substitute of trichlorethylene,
then a mixture of thinner and liquid detergent or liquid soap.
- Idea: hair brushes. they keep a nice shape if you wrap them
tightly in a cloth or a piece of paper, squeezing a little hair. Otherwise, you get a hedgehog!
- Tip:
Do not dip the brush into the paint to run ! the top of the hair should
not be moistened because it is the most difficult to clean. This remains
theoretical, because the paint ends up. That is why it must be thoroughly
cleaned by removing the hair to the top. A hard brush can be recovered
with acetone .. and a pair of pliers to crush the hair up and facilitate
the penetration of acetone. We generally are reluctant to, but better is to buy a new brush.
- To grasp the lid of the can without spoiling everything around, I suggest
producing a small accessory using a magnet, a spatula out of wooden or any else handle (wire..).
The magnet is to be quite simply stuck at an end of the spatula; this "catch the lid" o that it is possible to seize it, and turn it over, then properly put
it down, inside up, on any newspaper or protection.
The lid will be replaced according to opposite process's. The magnet can come from a magnetic closing of cupboard or a
magnet for posting.
From this idea, I manufactured a ustensil which allows in addition to open the lid, to plate
the the lid on the can, as well to pose the brush on it and moving with the whole stuff held in a single hand..
it's the "holder for lid of painting can and brush"
to know more.
"manufacture". Temporarily patented, it arrived semi-finalists at an innovation contest in Normandy; allows to open the
pot of painting, to place above the lid and the brush. Like all my suggestions and manufacture, it is usually used at home, including by my wife.
- Cleaning and brushes conservationto know more
Allows to prevent the brushes from drying between two layers (can keep it up to several weeks (supervising from
time to time); allows to even store and preserve the brush on the outside painting site; finally, ease the brush cleaning, or even roll, without dirtying oneself.
Frequently used.
you don't need a special can nor a grid to remove the paint from the roll.
Dip the roll vertically into the can and push down the paint in excess inside the can using a stick that you rub against the roll while
making rotating it at each washing down (on for faces of the roll); You can also maintain the roll above the can, dip a bigger stick or a brush
into and then coat the roll, making revolving it.
Sealing the can, peal paint formation. Before closing the pot of painting, scrape the paint around the lid because it is generally there that dried paint is
accumulated more, preventing a good closing (and thus
sealing). see photo
Paint peal formation.
To prevent the painting from drying too quickly and forms a skin, one usually pour a
small quantity of white spirit on the surface, but it is not enough if the pot is half
empty or more. See also above cleaning the lid. I currently, test a mean to cover the paint along with grtting a better sealing of the
lid.
Know more Level of paint
before closing the pot, trace a line with a large ink felt to indicate the level of painting which
remains. The weight alone teach few..
if the level is lower than half the can, think of transferring painting into a smaller pot, because there will be far too
much air (jam jar..). One can make that before reaching the half if one can get an adequate container.
Painting 3.
- Aspects and influence of paintings, some elementary rules .
Matt or gloss paint?
The matt/flat paint is softer than the glossy one and masks small defects of the surface ; but it dirty more (micro
cavities). Gloss paint (lacquer), is more lively and warm. It dirty less and clean better (smoother).
For a door, preferably take gloss one or a satin (between the two).
The satin paint is generally a good compromise, but it dirty a bit more than gloss.
For an interior wall, matt or satin, of course depending on the surface and direction of light.
Finally, try the satin paint for exterior walls (whole or half-height), they dirty much less and are more alived (now used for anti-graffiti walls).
Large defects can be enhanced (to be verifyied). Exterior door in bright, as are the fences .. One can also paint a stringcourse of roof if the defects are
not excessive.
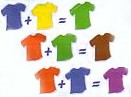
Color ; it is the most delicate ; a color on a small surface (on the pot for example), appears clearer than on large surface.
A dark color brings closer (restrict the distance) and a clear color enlarge.
So, a white painted room seems larger.
Modifying the aspect of a narrow and high corridor, it is
necessary to paint or paper the ceiling (even falling down 20/ 30 cm on the wall) with a dark color, and the walls with
a clear color. Walls exposed at the light can be painted in darker than those located in the shade. overlooking north, prefer a little "hot" color" on a wall. Attenuate the colour for a
wall in the light (sun) and too close, unless you do wish a particular effect. Two different colors can be used, for
example a color for three walls and another for the fourth (remember the problems of lighting and depths to be
rectified). Do not be afraid of the colors, even with old pieces of furniture or of style : they will be emphasized
and you will avoid dull. The colors "sharp" are reserved for the exposures and to the experts in decoration. Be aware of
complementary colors, which are opposed : in particular the green with orange, blue with the red, which can cause eye
trouble (tapestry striped).
Idea : Coloring a white paint.
To color slightly the walls of a room, I have used a white acrylic paint and a coloring powder sold for special coatings (king ancient walls). While
gradually adding the powder, on control very well the blend (I made one wall clearer than others). Sole precaution : mix vrery
carefully not to have much grain left . At the contrary, you can leave some of them to obtain a speckled effect. There are also liquid dyes
tube, but that does give the same effect and being much powerfull, are more difficult to control.
- Reflection of paintings : all bodies return a little the received light, as the moon (one calls that
albedo). Thus a coloured wall returns its color on another close surface ; if the colors are opposed, they die out
mutually. Conversely, they light each other and are emphasized; I thus changed the painting of the framing of my
door of entry, a blue which "extinguished" the color "wood yellow-red" of my front door. A closer color now emphasizes
it and I have compliments on my door that nobody saw before !!
- Layers, layers guarantee a good finish and a better resistance,
due to the mass of the product. It is a bit careless on this point for
two reasons: the thankless job of painting - which includes the
necessary sanding between coats - and the final cost. This is
especially true for the varnish. The Chinese lacquer, require hours if
not days. The number of thin layers is insane. The varnish on boats,
including luxury runabout like the famous Italian Riva, spreads I
believe in at least twelve layers, plus a new yearly. It shines! For a
bench outside and a door exposed to the weather, I decided to put six
or seven layers of (varnish. The result is currently very good although
I have not been given a new layer. I am probably wrongl
- Varnish ; the parquet lacquer is one of them ; this with a single component, satin, colorless. Not sold as
conventional coating, but it is effective to varnish, paint, wood,
masonry; glues and varnishes also sets of panels, decorative compositions ... Also take the test, your opinion interests me.
Cleaning (very fine if fresh), the substitute for Trichloroethylene (synthetic
ester).
- To paint without trace; To paint with a very fine finish, we need to spray. Here is what I do :
dilute the paint dramatically with a good paint thinner ( CR10, V33 thinner ..) until the paint gets very fluid. You then go with a
lint-free cloth or brush. As it is very thin, it will (this is the problem) many layers to stand the wear.
Such a procedure in very thin layers allows to get "aged worn paint".
We pass several layers of different colors including white, while brushing not regularly.
One can sand lightly to better show the lower layers.
I have so painted this rotin shelf that was not very fine, and that is now very fine (photo) and match with our bed back frame !
I have also painted a small round table and his feet with blue, green and white. See also "decoration".
- Alterations and small areas.
You do not buy a large can of paint for touch-ups, but we don't let in
their state scratches, knocks and others damages, doing nothing.
According to the parties affected (door jambs, walls, frames ..) we can
use pots and tubes for artistic paintings - generally acrylic -
or small pots of paint for modelling
(matte and glossy). Remember to make blends, such as painters do. In such small quantities.
There are also felt pens to touch wood (different colors) and colored wax sticks. they can fill small holes and cracks.
You can also edit the wallpaper. Simple markers or colored pencils can also be used. All may be thus refubished, frames, furniture, shoes
scuffed, artwork and even carpets.
- Preparation, rust.
Always wash and degrease the laundry detergent, alcohol, gasoline C / F etc. and also sand and level the imperfections (bumps, peeling paint) with a coating (ready in a
tube or box for small alterations. Sand ! put a first layer (sometimes a primer for better adhesion if the support is porous or not very
healthy) and re-sand. A beautiful painting must have at least three layers. Think at beautiful varnishes that have 12 layers, it will cheers you.
Rust. Remove rust and spend a thick anti-rust. There are
paint with a rust color, but not often. A good layer
anti-rust paint is needed especially outside. You can use a liquid that
causes a sulfation as reaction with rus. It's a bit dark blue,
it gets your fingers dark and it is difficult to clean. A lesser-known
product is the Rust .. Owatro (rust in English) .. product for rust and
paint. It is used by some professionals. It penetrates rust, but also
dilutes the paintings. For a metal gate, the three are not too many.
Put at least two layers of paint and do as well under the bars,
especially the lower (mirror inspection). Thirty years later, my
portals are still almost new, unlike many others that are wrecks. A
serious consideration every three to four years. Treat rust spot
without waiting for a new coat of paint.
Utility or futility? The brush sold by the meter ! it won't never be produced
but I propose a practical and useful alternative to help you out in
some cases. Take a piece of fabric, fold it in several layers and wrap
it around a stick, leaving about two inches free, then tighten it with
a thread or a rubber band. You have made a disposable brush, good
enough for all that does not require great finish.
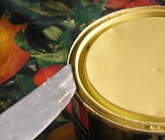 take off the lid with a knife blade (a real one, with a sharp blade and fine cutting edge, thick and strong opposite, on
the back). If you can bring the blade a little, the rest is patience.
Follows around gradually and not to pry it out completely by one or two points. Another unexpected tool very effective is ..
take off the lid with a knife blade (a real one, with a sharp blade and fine cutting edge, thick and strong opposite, on
the back). If you can bring the blade a little, the rest is patience.
Follows around gradually and not to pry it out completely by one or two points. Another unexpected tool very effective is ..


 Brush suitable for glossy paint (it allows to well line the edge); use it with small surface because a small roll can be better.
 The square pots
are the most difficult to open. Insert a blade at the locations
closest to the edge (4 white lines) to be able to le
The square pots
are the most difficult to open. Insert a blade at the locations
closest to the edge (4 white lines) to be able to le