- To position: to maintain an object standing in a certain position, in order to stick an element (handle of a cup) or to bore it, try to to fix it with rags or paper,
place it in a bowl (protected by fabrics), a salad bowl (tupperw..), according to what one has on shelves and dimensions of the object.
Another possibility consists in filling a plastic pocket with sand, flour, lentils, chickpea or other seeds ; one can thus make "a base" adapted to the object.
- To display a small object (in a window), mould a base with the "paste to modelling"(see repairs, broken part) see below.
An example is suggested in ideas deco,
stone collection (bases of blue colour). The modelling plaster is also interesting in this case, but not so easy to use.
- To hold a small nail, in a corner, prick it through a sheet of thick paper (sheet folded) or a plastic sheet cut out and strike just !
- Tightening.
Use a vice, but also a screw clamp which will be used to maintain parts to be stuck together and for other uses (see below my screw clamp "one
hand"); also bicycle tube, a strong rubber band a strap, adhesivetape, a piece of kitchen shrinkable film (unroll 10 cm and make a cord
while streching its 27 cm to nearly 50 ; also one of these very long balloons "sausage" for children (not inflated of course!!). And all you can find rather
long and elastic or retractable. Do several leaps (3 or more). The kitchen shrinkable film can be used to wrap bits and pieces.
- Trouser hanger. A rather good regular clamp for small works.
To be got from shops where they are used to hand trousers. These hangers have two clamps one can get alone while cutting the stick on
each side of them.
Right hand, one of them is used to fix a torn magazine cover with glue.
- Clamp "one hand":
the traditional screw clamp requires the two hands and "drives out" (skids) when the screw is tightened. To mitigate this disadvantage, a new screw clamp
"one hand" was invented and it is usually found in stores. I had manufactured of them a front good with a gun for
cartridges of masonry products and sealing (sheet iron model, but it is necessary to weld).
- The tightening grip.
One can maintain tightened two small parts, for a joining, by rolling up an elastic bond around the two branches of the
grip (regular one, multi-grip..). Maintain the grip tightened with the hand and let a little place at the end of the handles of the grip to start rolling
up around two or three wraps of strong rubber band, plastic wire etc (see bonds). Well tighteniong at each wrap.
By increasing the number of revolutions, the tension can become much stronger than with your hand !
- To immoblize with my multibase. (equipped with a clamp, also to cut, hammer, weld..
I used it as a small vice with broad jaws, support for electric-electronic weldings (small components, electronic cards), as support for joining; base to cut with a cutter ;
recover the refuses of sawing or filing. to be asked
"manufacture" Used everyday athome !!
- Suction pad vice (plate for): the suction cup vices always have a certain attraction, but one does not know or to fix them because the work board is seldom appropriate or clean ;
here an idea to use them: if you to find a rather large and thick iron plate, putting a piece of non-skid mat underneath or fixing it with a screw clamp.
My plate makes 16 by 24 cm and approximately 2,5mm thickness. Easy to remove and clean.
Not very easy to find, better o search something else as a shelf board with melamine(Formica), a large ceramic tile or glass (fragile for tightening), plastic tray or a piece of wood carefully painted.
- Non-skid mat: presented at the fair of Cologne by Wolfcraft (Germany), whereas that was for me only one simple practical idea.
I was rewarded for it by my only satisfaction!! (on sale in certain great surfaces of do-it-yourself to the Wolfcraft ray!).
Iit is an openwork plastic screen, grey or coloured, not very thick, the best I think having small like drops in texture.
Use it to immobilise the wood worked on the bench (my idea for Wolfcraft), bags in the trunk, lamps on tables, boxes. also to be stick under vases, lamps (glued with neoprene glue).
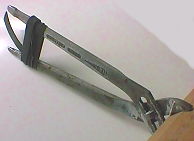
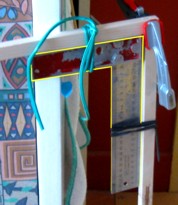
Assembly of a frame.
The picture shows how the sides of a frame must be kept square. For this purpose, I used a bracket (angle iron) whose branches are moored by elastic ties on two of the 4 wooden profiles that will form the frame.
This allows them to be glued and nailed or screwed.
There are accessories, more or less practical, more or less precise, or expensive.
Only the time spent, or the absence of a square, can encourage people to look for a more efficient solution (excluding driving, searching in the store, and waiting at the checkout).
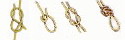
Nodes and bindings.
The most known node is that we are making to tie up a package or to attach our shoe laces.
Alternatives nodes were conceived according to professional needs, by the carters, the fishermen, the farmers, the sailors.
The good nodes doesn not slip; some can be easily untighten, even under tension, while being tightened when one draws them.
Click on the links to see the drawings..
We are speaking about ropes and not strings of kitchen. The detail is significant: the fine strings tend to form blocked nodes, they are
difficult to untie, where a large cord will slip; it is the case of the
reef knot, however rather used. Certain nodes are a bit complicated, like the famous "chair node", favourite of the the sailors who had to climb up to the top of the mast, with
a very relative comfort. Harnesses replace them advantageously, but the node of chair is free.
Here is a small selection of nodes, but before presenting them, always think of crimsonletting largely exceed the free end (minimum 5 to 10 cm for a large cord).
If the node slips a little while being tightened, the bit will not be able "to escape". In the event of significant slip,
you can make one simple node at the end of each free tip: the sliping will quick be stopped because the node of the tip never can pass through the main node (personal option).
Dissolve the ends of plastic cord (propylene) with a lighter or stick them, or tie up them so that the constituent stands are not demolished (see bindings after the nodes).
To demolish the node of a rather rigid cord, push on the free bit by twisting it (the best direction of torsion is often that which demolishes the strand).
Here after, I name "simple node, of lace", the first node which one makes with the laces of shoe.
It is the base for all things.
Excuses : knots names are more or less the french translation.
sheet node of the sailors.
Connects two ropes, does not block itself and does not slip; it cannot be undone under tension.
Half key node : it is in fact a simple node (of lace) made after having circled a stake, pillar etc. The cord is tighten (cord of mooring, clothes line), and its free end is raised up after having passed
through the loop. Like that, it just does not hold very well and it is necessary to do two or three nodes (half key)more one after the other. See below "half key braided".
Reef knot: node rather usually used, which is tightening itself in theory when one draws on each side from the cord. Can however slips according to the rope used (diameter, roughness) or undo itself
when is no longer under tension. It is in general very satisfactory for the strings. One must prefer to it the sheet node, described above.
Node of full fist: it is a simple node (of lace), but made by taking together in the hands the cord and a length folded backward, so that a loop is carried out.
Before making the node, if required threading in the loop the ring of pulley or the hook.
Node
half key braided is the same half key node but one does not make entirely pass the free bit which forms a double. In fact, to
refer to the lace, it is the loop which one makes on his shoe: it is enough to draw above for all to demolish. Note the three turns around
the pillar which relieve the tension on the node. It is a principle to retain.
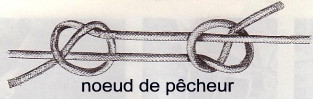
Node of fisherman: very practical and without fault to connect two cords; each free bit of fact a simple node (of lace) on the other;
while drawing, the two nodes tighten and block one against the other.
Simple node of chair: can appear a little superfluous but it is interesting if you want to make a loop, small or large, which its does
not tighten. Splices (for memory): allows to connect without node by drawing aside the bits of part of a cord in order to introduce the bits
of its folded up end there (to make a loop). It is necessary to respect the regularity of the twist. Enough difficult.
Bindings.
The turns are spaced here for a better understanding, but it is necessary to make them jointed.
One uses the bindings to tighten a split handle, to maintain or fix two elements one against the other (joining.), with the garden for the bouturage,
fishing for the hook or the fixing of the rings on the cane.
The principle is always about the same one: one tightens two elements while rolling up quite tight around them, a string, cord, nylon thread of
fishing or elastic band. The difference is due to the way in which one fixes the two ends of the bond. Generally, one starts to roll up by
leaving one of the ends inside; arrived at the end, one also makes pass the final end inside the whorls in order to wedge it, like the first.
Binding 1, one makes whorls which enclose one of the ends placed along
the part to tighten. With the end, to make pass in the whorls or part of the whorls, the end which one holds, one uses a needle.
Binding 2, it is my method: I make make an outward journey return to the bond
whose end A remains outside; the other hangs on the same level; I strongly support on the two bonds with my inch left side end and I make
the first turn (I am left-handed); I gradually move the inch towards the line. Arrived close to the loop, I thread the end which I hold
inside and I strongly draw on bit A, which makes return the other end inside the whorls.
Binding 3, one starts similar but with only one bit
inside, as into 1, but which will leave largely on the right. With the
end, one makes a node with this end and that which one holds in the
hand.
Binding 4, one can not roll up, but make nodes with each turn or
half-turn with two of the same bits length which remain both outside.
One braids to some extent the bond which one can more strongly tighten
- it is the interest - with each whole or half-turn; the difficulty in
maintaining tight each whorl or half whorl is a little less because of
the node. This bond, thicker, is not indexed, nor the
binding 5, which is better with a strong elastic band, my preferred for joining (cutting
of thin straps of tire tube of bicycle or motor bike. The elastic bonds
are the best, it is enough to make much turns. A wet leather lace will
very strongly retract while drying. With you to test and choose
according to case's.
Sharpening, trimming, scraping Blunt forests (wicks), knives, scissors (two-blade), wood chisels, planer blades...
Remove what "aggresses".Round a sharp angle, reduce a chipped part, burr on all materials: metal, glass, porcelain, earthenware tiles, plastic.esse".Arrondir un angle vif, réduire une partie ébréchée, bavures sur tous matériaux: métal, verre, porcelaine, carreaux de faďence, plastique.
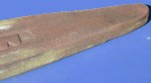
At least two types of sharpening stones are required to meet the requirements, one medium-grained and one fine.
"The average" can be a regular type stone, quite long and ovoid (two tapered ends, shuttle-shaped). It is a stone that is already thin, but which can, in addition to sharpening it, be used to soften glass or porcelain
(chipped dishes that you want to keep), sharp angles of cut glass, etc. The "thin" model is represented by this plate. It will be used for
finishing after the transition to the average or for delicate objects that the average abrasive could damage.
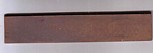
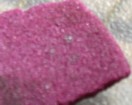
For tiles, bricks, a larger stone is needed, such as a grinding wheel to roughen with corundum.
Opposite is a magnified fragment of a grinding wheel for chain saw sharpening. This thin, red, thin wheel is however a little expensive.
It can be used with a drill by finding the right axis or by tinkering with one.
Its thinness and the quality of the abrasive are two advantages. Placed flat, it will serve to sharpen your tools.
Scrape. With a "knife" of painter and glazier (spatula, different widths), oyster knife, knife or small chopper (the thick and high blade can be held at
two hands). Or with a piece of wood saw blade cut with a grinder. A recovered steel blade. A thin steel blade also allows
to remove an adhesive by sliding it underneath or to remove a stone under the door etc. For best use, all blades can be sharpened with stone during use.
a CDROM scratches very well the stuck dirt and does not scratch; its grip is good and you can use all its circumference.
For scraping tiles, cement flooring, sink tops, dishes and utensils, glass. Avoid soft or fragile surfaces (stove teflon, wooden furniture, some plastics.
Scaling. To peel old paints that come off in thick plates, I used the following system; nail or screw upside down (teeth in (air) 4 or 6 capsules of fruit juice, beer..
on a wooden block; fill two thirds of a firm product such as granulated "modelling paste.
(see repair repair, plaster etc. This is to reinforce at little cost the hollow of the capsule which does not resist well to effort. it itches well! you can sharpen them from time to time.
time with a file; if these capsules were made of steel, it would be fantastic.
Sand - Polish.
The orbital disc sanding machines do a very good job, less devastating than with circulars simple. A very fine finish can be obtained. They have scratch plates (with the right discs) but one day, the discs no longer grip;
it is then necessary to change the tray. For my part, I stick the discs with neoprene glue on the tray! and then I tear off the disc I glued and reattach a new one.
Miniature sander/polisher. for fine sanding-polishing (small surfaces, jewellery). Use an electric toothbrush and attach a rubber valve washer directly on the steel axle.
Make a hole in the washer, smaller than the axis, for example by burning with a gas-heated embroidery needle or on the electric plate); you can drill completely and
glue a second washer on the first one (cyanolite glue); then glue your fine or very fine sanding paper (150 to 600 bodywork type) on the face of the washer (neoprene glue), and put on a sanding paste or use toothpaste.

 One can maintain tightened two small parts, for a joining, by rolling up an elastic bond around the two branches of the
grip (regular one, multi-grip..). Maintain the grip tightened with the hand and let a little place at the end of the handles of the grip to start rolling
up around two or three wraps of strong rubber band, plastic wire etc (see bonds). Well tighteniong at each wrap.
By increasing the number of revolutions, the tension can become much stronger than with your hand !
One can maintain tightened two small parts, for a joining, by rolling up an elastic bond around the two branches of the
grip (regular one, multi-grip..). Maintain the grip tightened with the hand and let a little place at the end of the handles of the grip to start rolling
up around two or three wraps of strong rubber band, plastic wire etc (see bonds). Well tighteniong at each wrap.
By increasing the number of revolutions, the tension can become much stronger than with your hand !
 finishing after the transition to the average or for delicate objects that the average abrasive could damage.
 For tiles, bricks, a larger stone is needed, such as a grinding wheel to roughen with corundum.
Opposite is a magnified fragment of a grinding wheel for chain saw sharpening. This thin, red, thin wheel is however a little expensive.
It can be used with a drill by finding the right axis or by tinkering with one.
Its thinness and the quality of the abrasive are two advantages. Placed flat, it will serve to sharpen your tools.
For tiles, bricks, a larger stone is needed, such as a grinding wheel to roughen with corundum.
Opposite is a magnified fragment of a grinding wheel for chain saw sharpening. This thin, red, thin wheel is however a little expensive.
It can be used with a drill by finding the right axis or by tinkering with one.
Its thinness and the quality of the abrasive are two advantages. Placed flat, it will serve to sharpen your tools.


 F
F


